Processing of UAS imagery in OpenDroneMap
Outline:- Setup VCL with Web OpenDroneMap (WebODM)
- Explore results from WebODM
- Run ODM from command line (optional)
- Sample of June 2015 UAV flight: photos and log.
- 2013 lidar interpolated DSM, use r.import.
- Processed results on drive: odm.zip
Tools:
- GRASS GIS 7
- OpenDroneMap (we will install it on VCL)
Preparing Docker and data
We will use VCL with Ubuntu OS, select Agisoft Photoscan & GRASS GIS - Ubuntu (Ubuntu 16.04 LTS). Alternatively, use OSGeo Live, or Ubuntu 16.04 LTS but they provide less computing resources. You can request it for 1 day or more if you plan to go back to the assignment later. You will need a remote desktop software to run the VCL, it won't run in your browser.- Once you start Ubuntu, it will ask about keyring, click Cancel,
then it asks about panel, say Use default.
Go to Applications - Terminal Emulator,
from this terminal window we will first install Docker from packages:
We also need docker-compose:sudo apt-get install -y docker.io git python-setuptools python-pip
To properly setup Docker in terms of user permissions, run:sudo curl -L https://github.com/docker/compose/releases/download/1.18.0/docker-compose-`uname -s`-`uname -m` -o /usr/local/bin/docker-compose sudo chmod +x /usr/local/bin/docker-compose
To make sure the permission changes take place, you need to log out (Applications - Log out) and then log in back. Then start the terminal again.sudo groupadd docker sudo usermod -aG docker $USER - Get your data ready: On your computer (not VCL), download the photos and log for the class. Unzip them.
- Finally, we will used prepared GCP file, which is in your folder with images.
WebODM has an graphical interface for creating this file as well. The format of the GCP file is:
where the numbers represent GCP X, GCP Y, GCP altitude, image column, image row, image name.WGS84 UTM 17N 708477.2014791 3956143.22167367 111.888 1341 722 dsc01547.jpg ...
Running WebODM
On VCL, in terminal, download WebODM code using Git:cd ~
git clone https://github.com/OpenDroneMap/WebODM --config core.autocrlf=input
cd WebODM
./webodm.sh start &
Further steps:
- On your host computer (not VCL) go to the IP address of the VCL (you get that number when you click Connect when you access your VCL reservation) and add ":8000", so it will be something like 152.7.86.219:8000
- You will be prompted to create an administrator account. Create it. It will be the only account we will need for the exercise.
- Alternatively, in the browser window on your VCL, go to http://localhost:8000.
- Upload images to the task which is already there or create a new one. Include gcp_list.txt file.
- In Resize images, change the size of images to 1000 to speed up the upload and computation (this reduces the quality of the images and the whole reconstruction).
- Once your WebODM is finished, you can explore data within WebODM (in VCL or outside), specifically the orthopohoto, point cloud, mesh and DSM. You can also download them, for next steps download the DSM (tiff), orthophoto, and mesh.
Using the results from WebODM
If the processing is still running and you can't wait, download precomputed results — odm.zip and unzip in your home folder.View point cloud
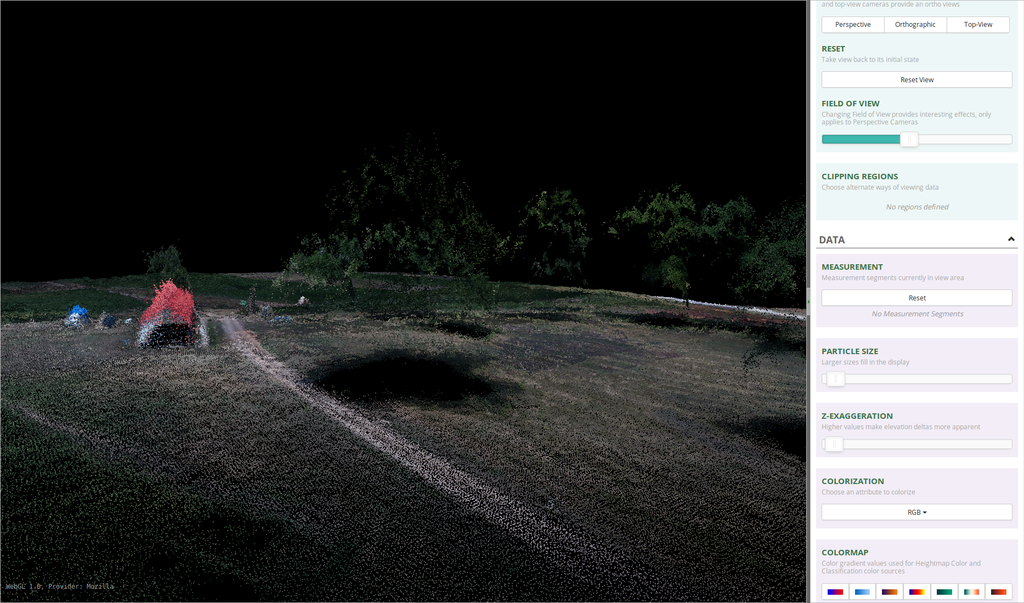
Look first at the point cloud (odm_georeferenced_model.laz) in plas.io.
View mesh
To view and edit the mesh stored as OBJ we can use MeshLab. MeshLab can also import the point cloud stored as PLY file. In VCL terminal run to install:sudo apt-get install -y meshlab
odm_textured_model.obj.
View DSM
Start GRASS GIS (Applications - Education), create GRASS GIS database directory grassdata
in your home folder. Create new Location (New button on the left)
based on the DSM. Type projection name and then select 'Read projection and datum terms from a georeferenced data file'
and browse to dsm.tif.
Start GRASS GIS in PERMANENT and set your working directory (Settings - GRASS working environment) where you have your odm folder. Import generated orthophoto:
r.import input=odm_orthophoto.tif output=odm_ortho
g.region raster=odm_ortho.1
r.mask raster=odm_ortho.4 maskcats=255
r.composite red=odm_ortho.1 green=odm_ortho.2 blue=odm_ortho.3 output=ortho
r.mask -r
r.import input=dsm.tif output=odm_dsm
r.import input=mid_pines_lidar2013_dsm.tif
r.mapcalc "diff = odm_dsm - mid_pines_lidar2013_dsm"
r.colors map=diff color=differences
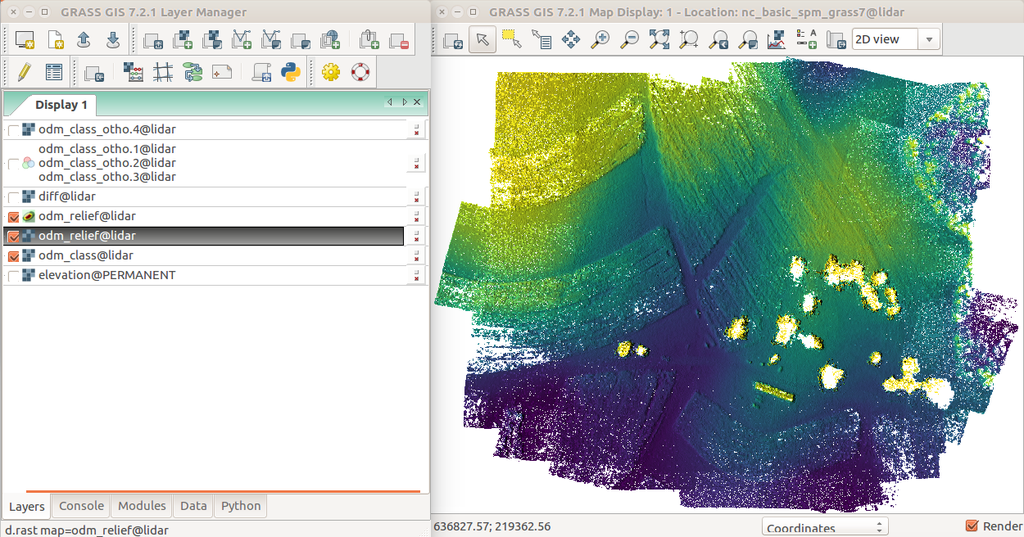
Example resulting shaded DSM created in GRASS GIS based on a point cloud obtained by the above process.
Example resulting shaded DSM created in GRASS GIS based on a point cloud obtained by the above process.
Running OpenDroneMap in command line (optional)
We will run OpenDroneMap in a command line using Docker to simplify setup (the internally used operating system is Ubuntu). To setup ODM:- We will download a pre-built image of OpenDroneMap:
docker pull opendronemap/opendronemap - Either in file manager or in command line create a directory
called
odm. Put it somewhere with enough disk space (home folder). Inside theodmdirectory create directoriesimages,orthophoto,georeferencing, andtexturing. On unix-like systems, creating the directories would look something like this:cd mkdir odm cd odm mkdir images mkdir orthophoto mkdir georeferencing mkdir texturing - Get your data ready:
Open browser (Applications - Internet - Firefox).
Download the photos and log
for the class. Unzip them. Move the images and all the other files
to the
imagesdirectory (no subdirectories). On unix-like systems, moving of the files would look something like this:
You should see a lot of .jpg and couple other files listed when you run:mv unzipped-dir/* images/ls ~/odm/images
docker run -it --rm opendronemap/opendronemap --help
We will keep default values, but we need to specify the path to file with GCPs.
Some explanation of the docker run command:
-vlinks our directoryimagesto a directory inside Docker container- The string
$(pwd)in the commands stands for the current working directory which should be theodmdirectory we created earlier.
cd ~/odm
docker run -it --rm -v $(pwd)/images:/code/images -v $(pwd)/orthophoto:/code/odm_orthophoto -v $(pwd)/georeferencing:/code/odm_georeferencing -v $(pwd)/texturing:/code/odm_texturing $(pwd)/dem:/code/odm_dem opendronemap/opendronemap --mesh-size 100000 --resize-to 1000 --dsm --gcp /code/images/gcp_list.txt --force-ccd 23.4
--opensfm-processes command
line option.
Open System Monitor (Applications - System - System Monitor), go to tab Resources. You can observe here how ODM uses parallel processing for different parts of the computation.
Once computed, all results are stored in the odm directory,
specifically in orthophoto, georeferencing, texturing, and dem
subdirectories.